INTRODUCTION TO ANYPOINT PLATFORM AND MULE ESB – PART 2 – API LIFECYCLE
Anypoint Platform with Mule ESB is a popular choice for integration. In the previous part of Introduction series, we discussed about point-to-point integration, challenges faced in integration, how ESB helps and overview of Mule ESB.
In this Article, we will explore API Life Cycle (API Design, Build/Implementation, Deploy and Manage) with different offerings of Anypoint Platform.
What are APIs?
API (Application programming interface) is an interface of your software application for external world. An external application uses your API to send requests to your application and get responses from your application.
Web APIs can be created using SOAP webservices, RPC and REST. This article is written from the perspective of REST and RAML which is the popular way of creating API and API specifications.
REST API and RAML Specifications
REST(Representational State Transfer) is the popular way of creating APIs and uses HTTP protocol over web although REST is not limited to HTTP protocol. REST allows multiple representations for example- JSON,XML or other formats based on client requests.
REST uses HTTP methods like GET,PUT ,POST ,DELETE, PATCH, HEAD,OPTIONS for actions on Resource at Server end.
REST is a stateless API which requires separate calls to the resources and does not maintain state between calls. The required data is passed in each call to the resource and is not maintained at the server end.
The API specifications/contract of REST API is created using RAML (RESTful API Modeling Language).RAML is created using YAML which is like a plain text.
Use case
Let’s take a simple use case to understand the API life cycle using Anypoint Platform offerings.
A Company “TrainingChannel” wants to create a Training Website which will display Trainings offered by different Training companies. Each Training company can also use this website to add/update or delete the trainings.
The requirement is to create an Integration Application with API.
- This API will be used by TrainingChannel Company’s developers for their website.
- The Integration Application will connect to different Training Companies – IntegrationTrainers and MuleESBTrainers to retrieve their training details.
- Students will visit the TrainingChannel ’s website to view the available trainings

- “IntegrationTrainers” – a training company that updates all details in the database
- “MuleESBTrainers” – a training company that uses a REST API to expose its training details.
- Our integration application, created using MuleESB , will retrieve training details by connecting to IntegrationTrainers’ database and MuleESBTrainers’ REST API .
Resources
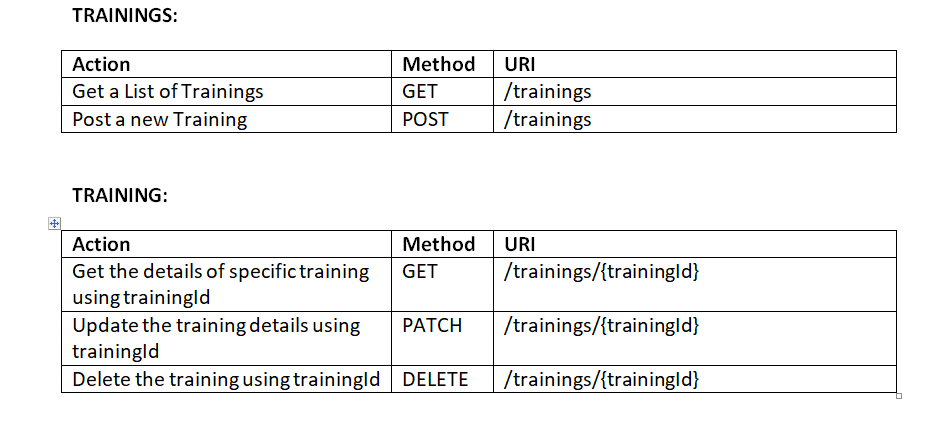
First, we will identify the Resources for our REST API. In this use case, we have two resources (to keep the use case simple) – TRAININGS and TRAINING
Methods, Actions and URIs
Methods, Actions and URIs associated with each resource –
Anypoint Platform
Anypoint Platform is complete solution for API Led connectivity. Create an Anypoint Platform Account using Sign-up or join an existing Anypoint Platform organization by an invitation from organization administrator –


Designing API – Design Center with API Designer
Create RAML specifications Using API Designer
Design Center has a tool known as API Designer to create RAML Specifications. RAML can be created using Visual Editor or Text editor which provides auto suggestions.
Base RAML Specs for our use case is –

Following is the complete RAML API Specification for our use case which is designed using API Designer –
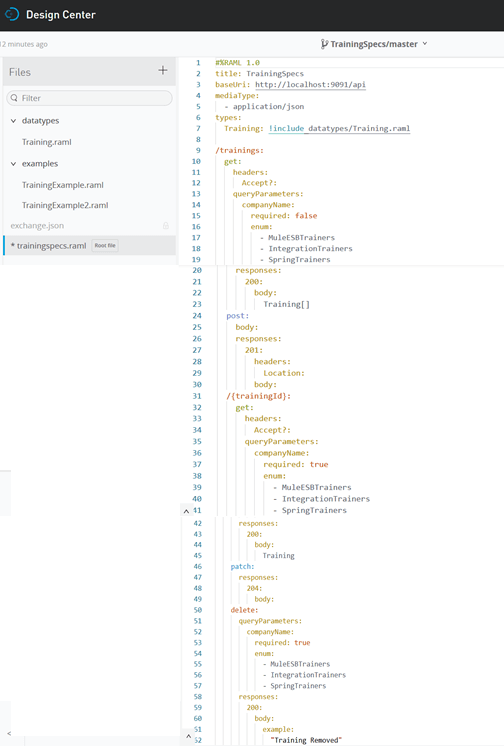
The RAML specification has title, baseUri and version of the API. A resource is specified using / and : i.e. /trainings: and /trainings/{trainingId}:. We have also added HTTP methods, mediaType , query parameters, response codes, response headers, Training datatype and this datatype refers examples –TrainingExample and TrainingExample2.
Datatype and Examples used in the RAML –


In RAML specifications, we can also add custom error information, descriptions, documentation, traits, resource type etc.
Preview in API Designer
API Designer also provides preview at the right hand side of the screen as shown in screenshot below.
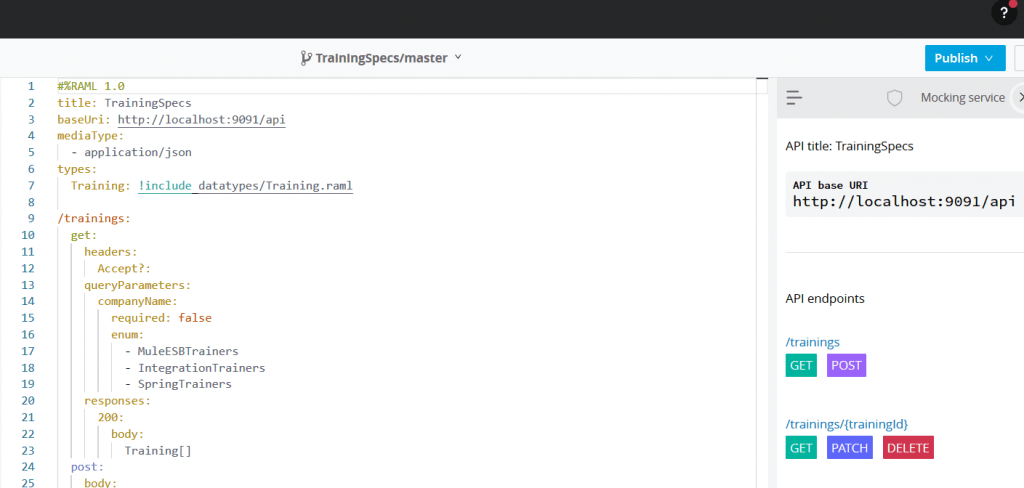
Using Mocking Service in API Designer
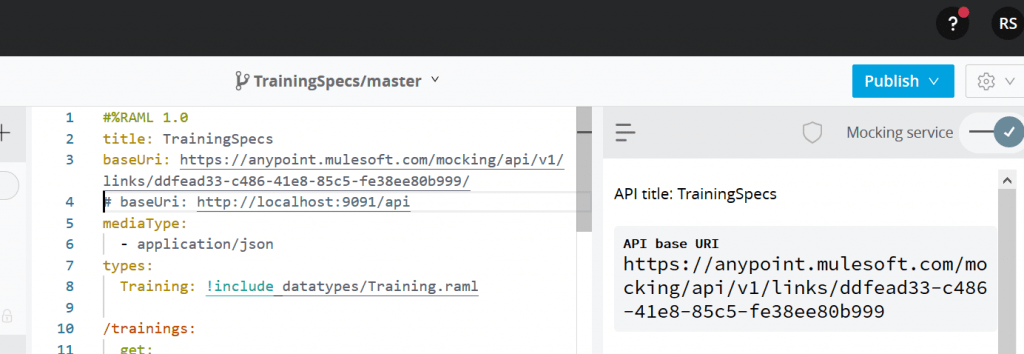
A mocking service can be used to test the behavior of APIs and the test returns the example data added in the RAML specifications.
In the screenshot below, you can see the Mocking Service is switched on by moving the slider to right side . Notice that base uri is changed to mocking service URI and now the API specifications can be tested.
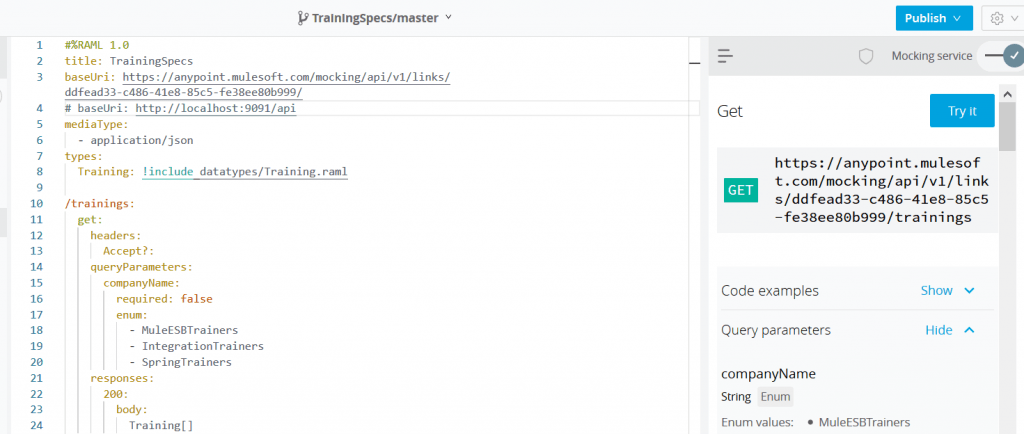
You can click on any HTTP method for any URI and click Try It. It will show the example that is added in the RAML Specification.
Publishing API to exchange
Anypoint Exchange is a repository for reusable assets like connectors, Examples, APIs, API fragments provided by Mulesoft to connect to applications. Your organization can also privately (within its organization) or publicly share its assets through this exchange. Your APIs can be published in this Exchange to promote organization-wide use of this shared asset by multiple projects.
You can click publish -> publish to Exchange to publish your API to exchange as shown below :

In this use case , the API is published to Exchange under Training Organization (any name you set for your organization when you sign up to Anypoint Platform) –

Click on the published API to view the details –

API Build/Implementation
Implementation of API
Integration applications are developed to connect to different applications whose integration point is based on different technologies e.g. JMS, File System, SOAP, REST, Database, Salesforce, FTP,SFTP, Email and many other technologies.
Flows
Mule Integration Applications are created using Flows. Flows integrate two or more applications and it transfers message from one software application to another .These flows are created using Visual Interface or XML files.

Events/Messages
Message sent from one application is first captured by event source which is transformed into message/event understood by Mule. These events can be further filtered, validated or routed to different event processors. The logic can be executed in parallel, aggregated or scattered to multiple targets. It provides both – real time processing and batch processing. The calls can be scheduled, Synchronous or Asynchronous.

Other features
Modules: Mule Runtime comes with some pre-existing integration components as part of Core Module. During development, you can add more modules based on the requirements of your application. For example : Database Module consists of connectors to insert, update data into tables and JMS Module consists of listener, publish, publish-consume etc. The connectors are operation based e.g.: Insert connector in Database Module for the operation of inserting data into tables and Publish connector in JMS is for the operation of publishing JMS Message to message broker.

MAVEN: Mule applications have built-in support for Maven. Adding any module automatically add the module libraries in the pom.xml.
MUNIT: Munit is used for creating automated unit and integration tests for Mule Applications.
Error Handling : Different types of Error Handling possible using on-error-continue and on-error-propagate.
Transactions: Local and XA transactions can be used in these flows.
Tools used for development
Mule Applications are developed using –
Anypoint Studio(Desktop IDE) –It is based on Eclipse and can be downloaded from Mulesoft site.During development of integration applications, test these applications within the Anypoint Studio as the studio has built-in runtime engine.

Flow Designer (Web Interface) – In Design Center, we can create simple mule applications using Flow Designer. The flows are created using visual components. These applications can be directly deployed to CloudHub from flow designer.

Use Case Implementation
Development
Let’s look at the implementation of resource TRAINING for GET action i.e. GET /training/{trainingId} which retrieves the details of a particular training. We need to also pass the query parameter – companyName with the name of Training Company.
A mule project can be created using RAML specifications. This will generate a main flow which we will connect to backend flows.
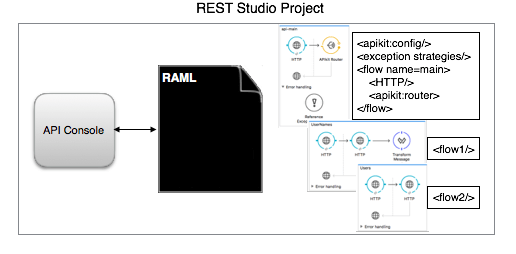
Main flow contains API Kit router which routes the incoming messages to back end flows and v.v.
In the screenshot below , we have a main flow which has APIKit router and the APIkit generates a backend flow for each resource-action pairing in a RAML so two backend flows shown here are get:\trainings and get:\trainings\{trainingId}
In these backend flows , we are using flow reference to refer to other flows with name getTrainings and getTrainingUsingTrainingId which are implemented with our logic of use case.This logic can be directly included here in the backend flows but to have modularity, we have separate flows.
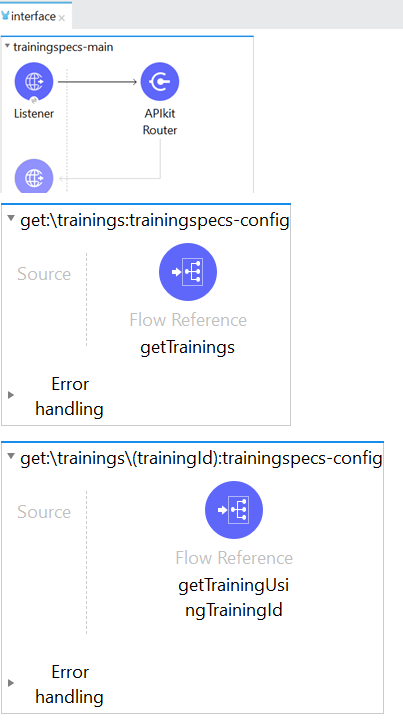
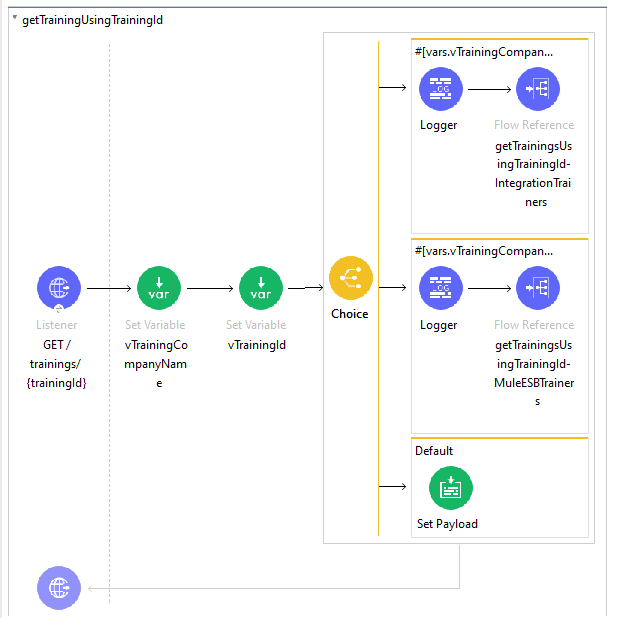
In the screenshot below, we have implementation flow – getTrainingUsingTrainingId.This flow checks the training companyName and sends request to flow of either IntegrationTrainers or MuleESBTrainers.
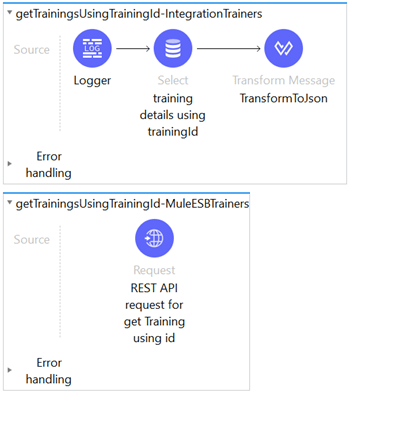
In the screenshot below, we have implementation flow of IntegrationTrainers and MuleESBTrainers.Training details in first case are retrieved from the database and in second case using REST API request.The trainingId is passed in both cases.
MUnit Testing
MUnit Testing
First Test case is created for getTrainingUsingTrainingId flow. To test, we have set the event/message with trainingId uri parameter and companyName queryParameter.The result is checked using AssertEquals.

The second TestCase is also created for the flow getTrainingUsingTrainingId . We have used a mock for the external call from the tested flow – getTrainingUsingTrainingId.

Deployment
Mule Runtime Engine, Runtime Manager and Runtime Manager Console
Mule Runtime : Mule Runtime engine is the engine used for running the Mule ESB applications both on the on-premises Mule Instances or CloudHub workers.
Runtime Manager : Features of Runtime Manager includes –
- Application and Server Management
- Deploy, Undeploy and Update Applications
- Register on-premises servers
- Monitor Server and Application Status
- Sign in to Anypoint Platform to use Runtime Manager
Runtime Manager console: Runtime Manager comes with a console. The console is used to deploy and monitor your applications on on-premises mule instances or CloudHub.
Hosting
Mule Integration applications can be deployed and hosted on –
On-premises Mule Server instance
- Customer managed Mule Server instance on bare metal machines.
- Deployment done manually, Anypoint CLI or Runtime Manager Console
Cloudhub
- MuleSoft Managed iPaaS
- Deployment done using Anypoint studio, Anypoint CLI or Runtime Manager Console
Runtime Fabric
- Mule runtime using Docker and Kubernetes. Proxies and Applications are deployed in containers.
- Customer Managed Infrastructure which can be on-premises bare metal servers or on cloud like AWS or Azure.
- Deployment done using Runtime Manager Console or Anypoint CLI.
Anypoint Private Cloud Edition
- Uses Docker and Kubernetes
- Deploy applications on Mule Server using on-premises Runtime Manager Instance provided with PCE or using Anypoint CLI.
The deployed applications can –
- Integrate customer applications which are hosted on cloud
- Integrate customer applications which are hosted on on-premises servers
- Integrate customer cloud application with customer on-premises application
- If applications are deployed on cloudhub then u will need a VPN connection
- If applications are deployed on on-premises then there is no requirement of VPN.
Use case Deployment
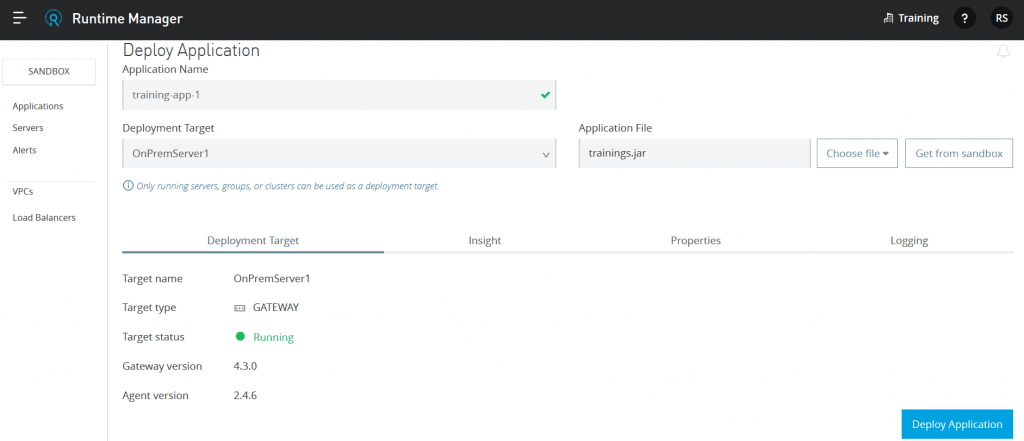
In this use case, we are deploying the application on the on-premises Mule Runtime using Runtime Manager. You can get a trial version of Mule Runtime from MuleSoft site.
- Step 1 – “Add server” to register on-premises mule server with Runtime Manager . The amc-setup.bat is available in the bin directory of Mule Runtime. The command details are available in the runtime manager console

- -H represents a base64 encoded string that specifies the exact business group and environment with which to register Mule with Runtime Manager.
- Step 2 -After registration , we will run mule.bat(windows environment) from the bin directory of mule runtime. This will start on-premises sever.
- Step 3 – The status can be checked on the runtime manager console –

Step4 – export the training application from Anypoint Studio to build a deployable archive –

Step 5 – Deploy the Application to server using Runtime Manager Console –
Managing API – API Manager
API Manager is a web based control plane which is used to secure and manage your APIs. APIs can be managed by checking the status of current APIs, setting up API proxies with policies and viewing API analytics.
API Proxy
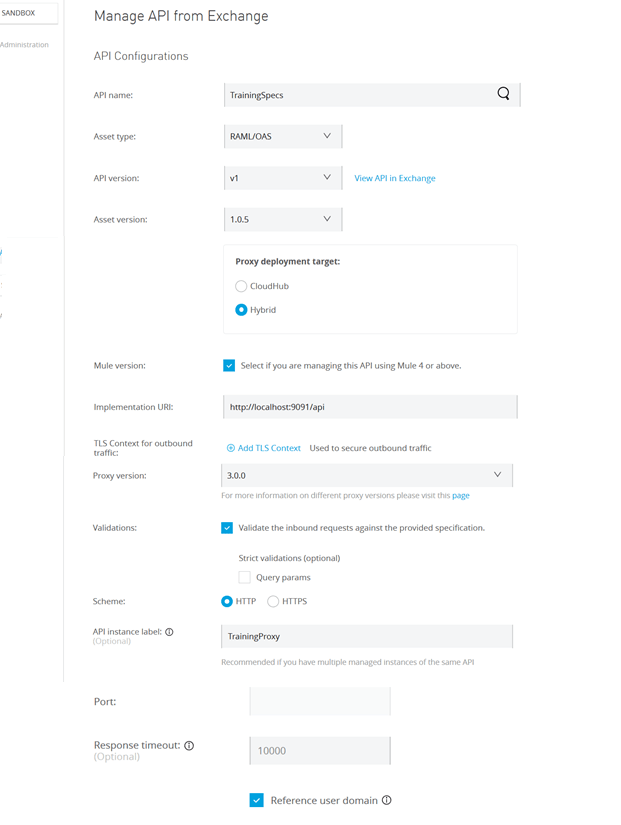
API Proxy , created using API Manager, control access and traffic to your APIs. The API proxies can be configured with various polices to secure, configure SLAs, limiting number of connections to the specific API endpoint and many more. API proxy also provides a separation layer for your APIs.
API Proxy deployment can be Hybrid or cloudhub.
In the screenshot below, we are creating an API Proxy from API Manager as per our usecase. The deployment is hybrid – we are deploying API proxy on the on-premises server.

Testing use case application using Proxy
Retrieving training using proxy host and port rather than calling application directly using its host and port

Applying Policy
Different types of Policy can be configures in your proxy.
Example screenshot of Rate Limiting Policy which configure number of allowed requests in a time period –
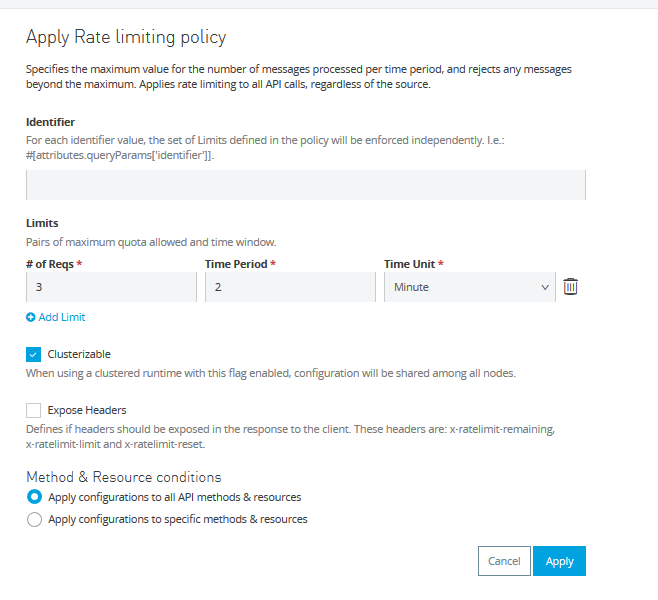
If number of requests becomes more that configured value, the proxy throws an error to the client –

API Analytics
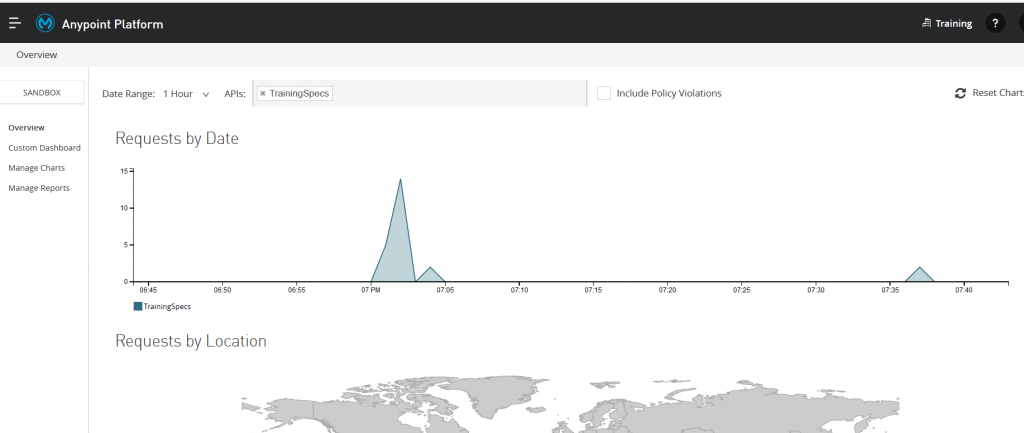
API Analytics provides customizable dashboards, charts and report which can be used to view metrics for analysis. You can see requests by date, Operating System, location etc. This helps users in governance and control.
This article has explained Tools offered by Anypoint Platform for managing API Lifecycle of Integration Applications which uses Rest APIs with RAML Specification.
I hope you find this article useful. Please feel free to share your comments.

